
In part 1 of my OSCP Journey, I wrote about the course, labs, and my exam experience and was essentially my review of them. In part 2, I am going to share my tips and tricks that made my life a lot easier when I worked through the PWK labs and the OSCP exam. I also used this same setup when I worked thru both the eLearnSecurity eCPPT exam and the eCPPTv2 exams. All of these hands-on technical certifications will challenge you, and being organized is one of the best ways to ensure your success.
Virtual Machine Shares & File Storage
A life saver for me was the ability to add a shared folder to my PWK VM. I worked out of a directory that I created a symlink for in my /root directory which automatically saved to my host machine (Mac) and then I had that configured to automatically update to the cloud via Google Drive. This way if anything happened to the VM either by accident or mistake I wouldn’t lose any of my data. Add in the ability to restore a VM and restore a shared drive within a minute, I could be back up and running even if someone had exploited my machine and rm -rf’d me.
Note: NEVER do this for an actual pentest with client data, normally clients get sensitive about backing up their sensitive data to a cloud drive. For an instance like that I would do the same setup, but have the folder backup automatically to a local backup drive instead.
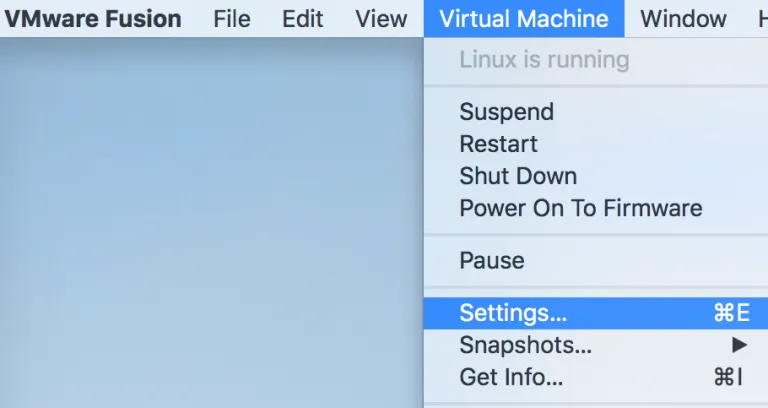
The settings below are specific to VMWare Fusion Pro but are nearly identical in Workstation Pro for Windows. If you click Virtual Machine > Settings that will bring up a menu of all the VMWare settings which can be configured for that VM.
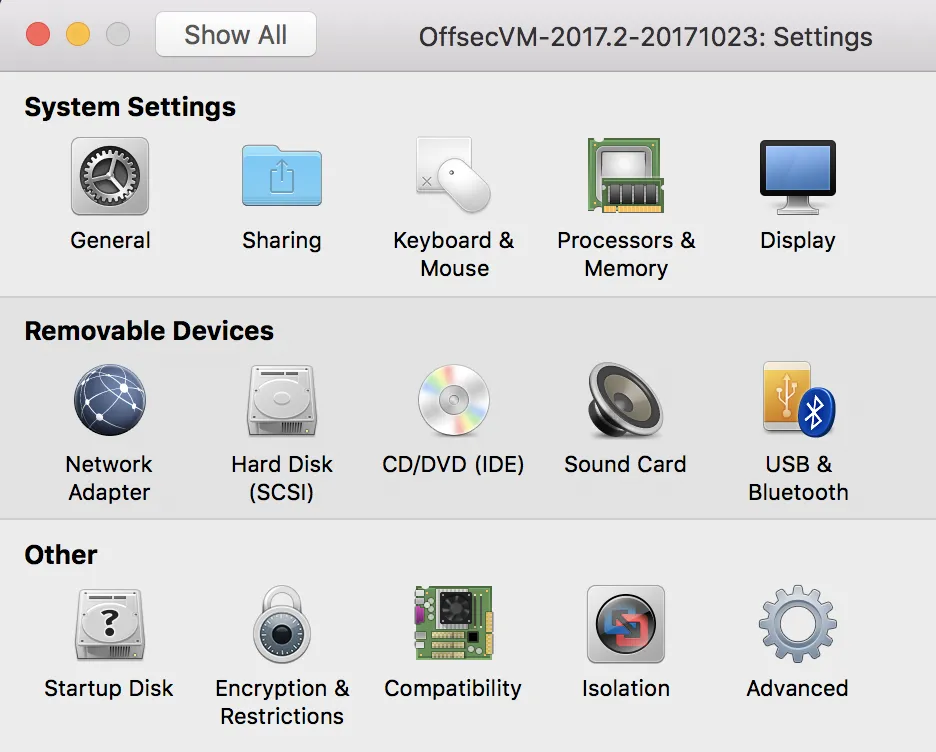
From the VMWare settings specific to the PWK VM called “OffSecVM-2017.2-20171023”, you can configure a multitude of options. I definitely recommend giving the machine at least 6GB of RAM but preferability 8GB. Some of the java based tools can be very intense on memory. If you have several CPU/core’s available consider upping that number as well. The real feature we want through is the Sharing option.
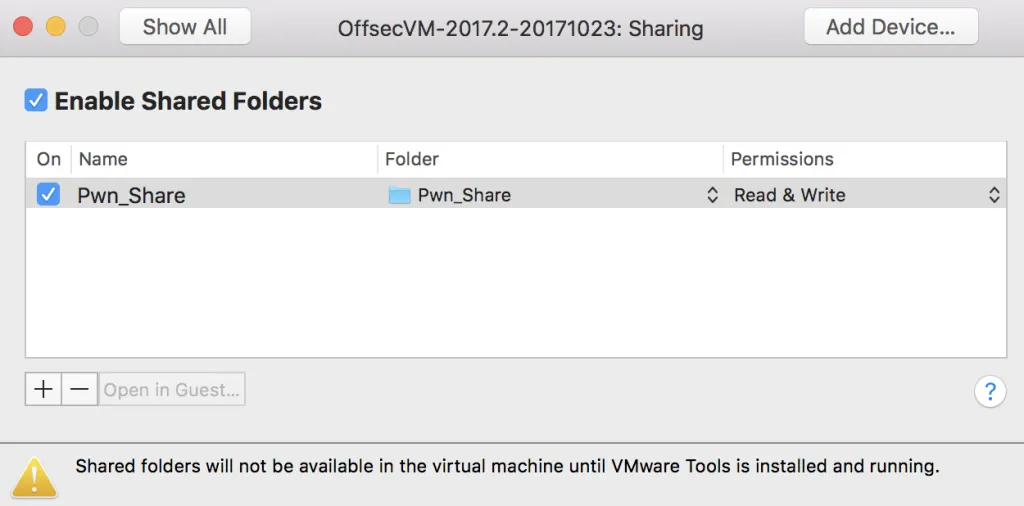
Within the Sharing option gives the ability to Enable Shared Folders checkbox and then ultimately add a folder on the host machine that is shared to the VM. In my case I created a folder on my MacBook inside of Documents called “Pwn_Share”. I gave the VM the ability to read and write to this folder. Anything within that folders placed their from the Mac or the VM would “sync automatically” since it’s the same storage location.
I wanted the ability to organize my folders in a way that made sense to me, so I could easily transition to other lab environments, access specific exam notes, access exploits I commonly used and had pre-compiled, or access the notes I created for each lab machine.
Now to access this newly created Pwn_Share folder in the actual PWK VM, we need to mount it. Conveniently for us, there is a script on the desktop called mount-shared-folders.sh this script when run in terminal will mount anything available from the VMWare Share in the /mnt directory. If you don’t have that script available, its pretty simple:
#!/bin/bash

vmware-hgfsclient | while read folder; do
echo "[i] Mounting ${folder} (/mnt/hgfs/${folder})"
mkdir -p "/mnt/hgfs/${folder}"
umount -f "/mnt/hgfs/${folder}" 2>/dev/null
vmhgfs-fuse -o allow_other -o auto_unmount ".host:/${folder}" "/mnt/hgfs/${folder}"
done
After running that script, you will be able to access that shared folder inside of the /mnt/hgfs/ directory as seen below. Where the magic happens is creating a symlink to that shared folder for faster access. I decided to create a symbolic link to it within my /root/ directory, specifically /root/pwnshare would be linked to the /mnt/hgfs/Pwn_Share/ folder. The command to do that is:
ln -s /mnt/hgfs/Pwn_Share/ /root/pwnshare
Automatic Backups to the “Cloud”
I decided to use my Google cloud account called Google Drive, but the same process works for Microsoft OneDrive or DropBox.
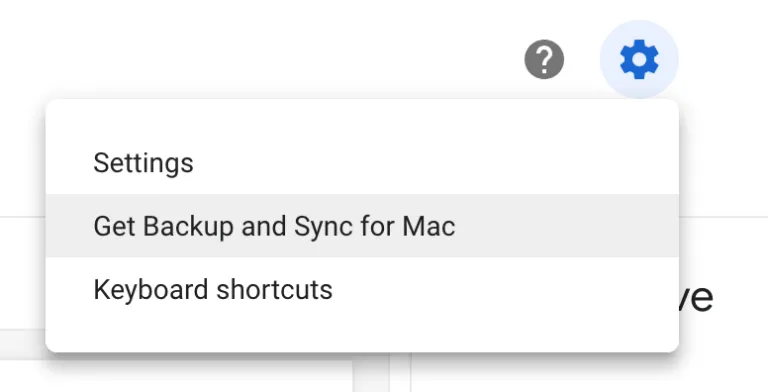
Within a Google Drive account click on the gear icon in the top right hand corner, and then “Get Backup and Sync for Mac”. There are similar options available for Windows. After installing this will create a little cloud icon with an up arrow in the dash in the top right of your Mac. After signing in with your Google account you will have options to configure the preference appropriately.
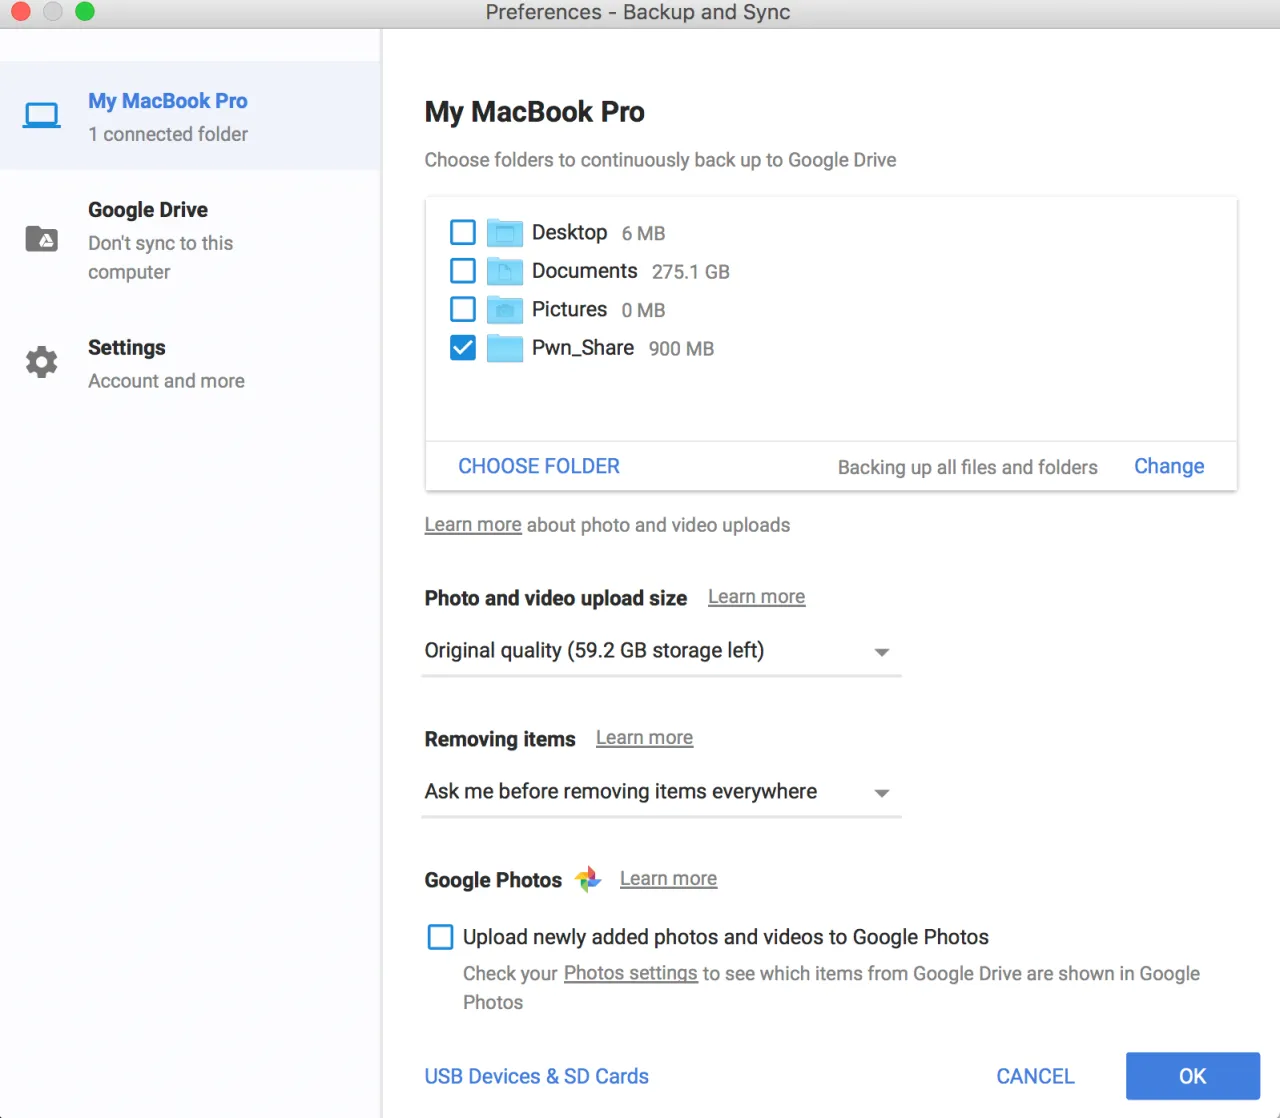
The Backup and Sync Preferences will allow you to configure which folder on the machine you want to automatically save to the cloud, simple select the folder you created and setup as a share with your PWK VM. In my case, it was my “Pwn_Share”. Now any file or folder that you create, edit, or delete, regardless if it was on the host or the VM will automatically sync to your cloud account. When deleting a folder or file within this automatically synced folder, Google Drive will prompt you are you sure you wanted to do that. Clicking on Yes will delete it, clicking No would restore the file. This is great if you accidentally delete something within that folder and wanted to get it back easily.
Aliases
I used a few aliases that were super convenient for me. I’ll explain what each did and why I used them below.
Edit your /root/.bashrc file and place your aliases within that file. After opening a new terminal, you can access those newly created aliases.
# ALIASES
alias vpn='openvpn /root/pwnshare/VPN/OS-XXXXX-PWK.ovpn'
alias rdp='rdesktop -g 85% -u offsec -p PASSWORD_HERE 10.11.14.134 &'
alias mapshare='ln -s /mnt/hgfs/Pwn_Share/ /root/pwnshare'
alias l='ls -la'
alias webup='python -m SimpleHTTPServer 80'
alias shieldsup='tcpdump -i tap0 -nnvv src net 10.11.0.0/24 and dst 10.11.0.54 -w - | tee capture.pcap | tcpdump -n -r -'
alias ss='searchsploit $1'
alias ssx='searchsploit -x $1'
- VPN – this on was for my to connect to the OffSec labs quickly. I had also modified my OS-XXXXX.ovpn file to read my password from a text document, that way I wasn’t prompted for a password and it just connected by typing VPN and hitting the enter key. More on that below.
- RDP – This one was to launch a rdesktop as a background process connecting to my Windows VM that OffSec gives you to conduct several exercises and practice your buffer overflows.
- MAPSHARE – If for some reason the VM lost the symlink I created I would run this, normally after a reboot I would only need to run the mount script on the desktop.
- L – I was really lazy, and typing ls -la was annoying to me, so simply typing the “L” key and enter did the same thing.
- WEBUP – This was to launch a python based simple HTTP server on port 80 from my current directory, very handy for serving up exploits or other files I needed to pull down to the target machine.
- SHIELDSUP – This I used to run tcpdump’s from my VPN interface and to only look at source IP’s from the other attackers range and with a destination of my assigned IP. This was piped over to tee and then read back in, this worked for a bit so I would store the pcap and read it in so I could look for connections at the same time in a terminal window. This ultimately broke and I didn’t have the cycles to fix it. This was important to me at first because I wanted to see what other attackers were doing if they decided to attack me. That’s a huge no-no from OffSec but it does happen, be safe out there!
- SS = This searches searchsploit for a variable I would type. So typing “ss webmin” would be the same as “searchsploit webmin”. Handy when searching a lot.
- SSX = Same as SS, but makes use of the -x flag to look at the exploit ID number you provide. If i found one I liked I would type “ssx 10094” for example to read that exploit ID.
“Passwordless” VPN Connections
In conjunction with my “VPN” alias above, I modified my OVPN file to not prompt for a password each time. I found that highly annoying and wanted a way to easily connect without being prompted for a password. Below are the steps to do that:
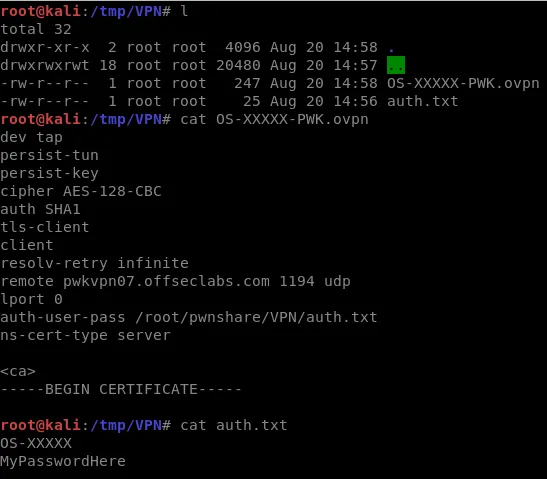
- Modify your OS-XXXXX-PWK.ovpn file where XXXXX is your assigned OffSec ID
- Include a line in your .ovpn file that points to an authentication file like so: “auth-user-pass /root/pwnshare/VPN/auth.txt”
- Create an auth.txt file that you’ve pointed to in the line above, be sure to include your OffSec ID and on a 2nd line include the assigned password.
- Note: You may want to set proper permissions so only root has access.
Screenshot Hotkeys FTW
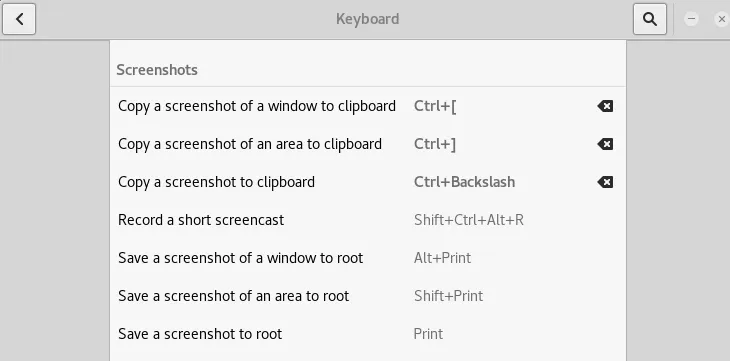
Anyone who’s played Starcraft or WoW knows that hotkeys are life, they help get the job done very quickly and efficiently. My documentation style was to create a ton of screenshots, for this I needed a way to quickly take screenshots and mapping some hotkeys to do that was critical. I used the built in Kali keyboard shortcuts to map the built in tool for creating screenshots.
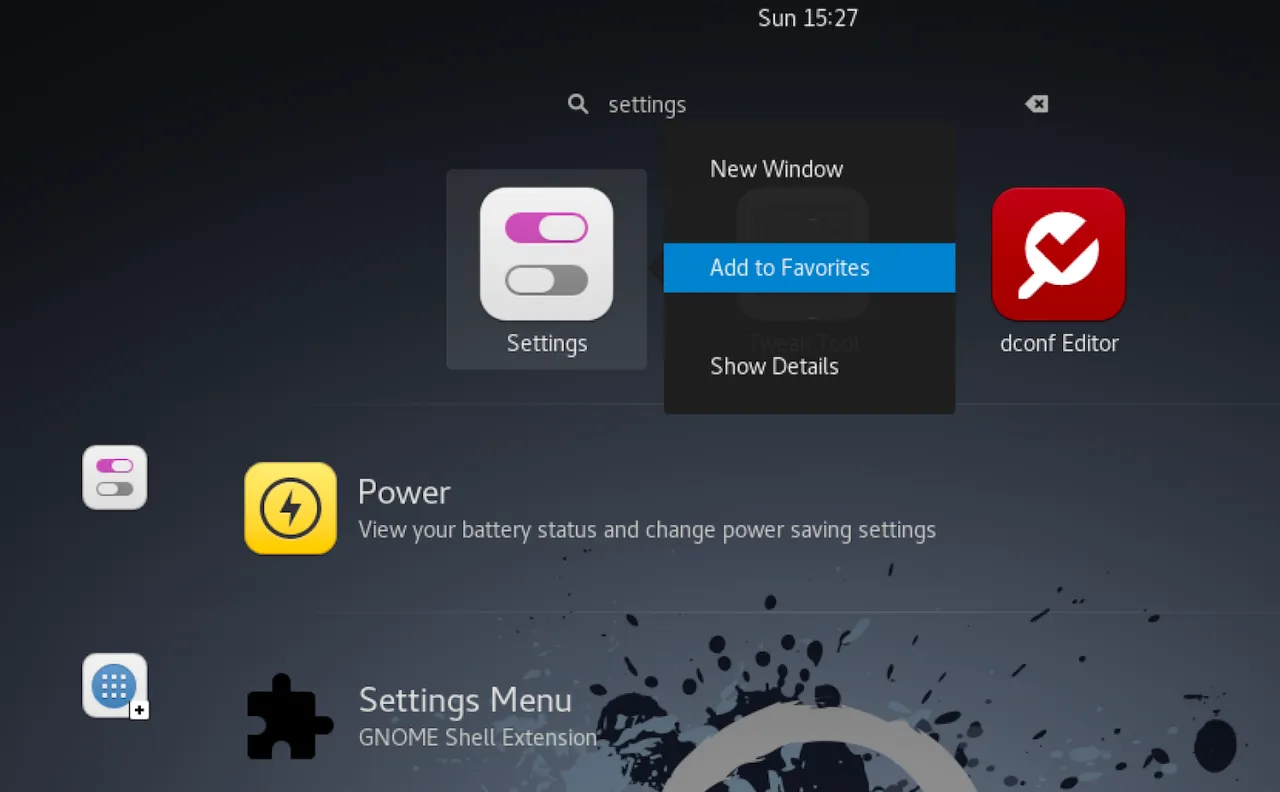
To do this, you need to bring up the Settings control. This can be done by hitting the space key to bring up the dashboard and simply typing the application you are looking for. In our case, “Settings” will do the job! As an added bonus, if you want to map any application to the quick-launch bar on the left hand side called the “Favorites” simple right click and select “Add to Favorites”.
From the Settings menu, select Keyboard which will bring up all of the bound hotkeys for the keyboard. Scroll down to the Screenshots section and bind some keys! I chose to use “Ctrl + [“ and “Ctrl + ]” to either take a screenshot of my current window to the clipboard or a screenshot of an area I dragged a section over to my clipboard. From there I was free to paste the screenshot on the clipboard into my documentation tool of choice, for me it was Microsoft OneNote but MagicTree or CherryTree which is included in Kali works too.
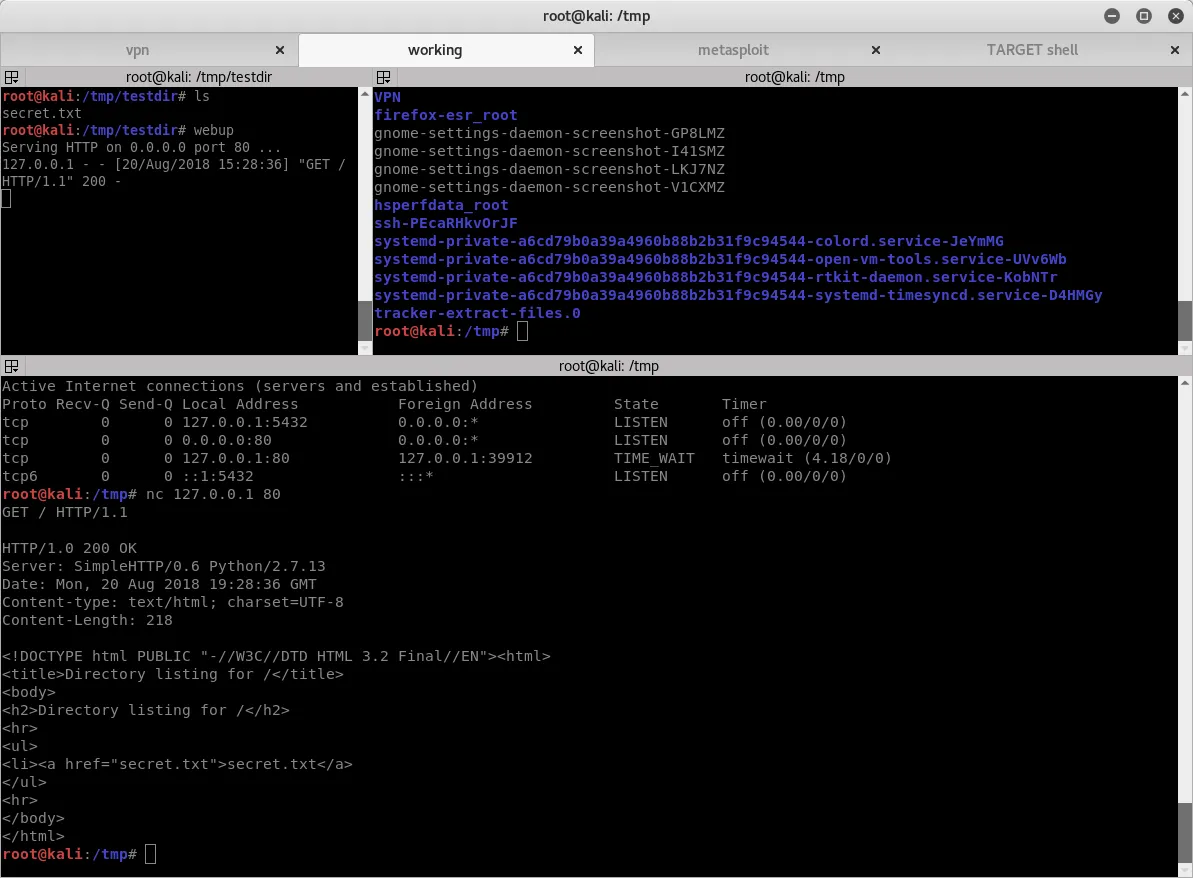
Terminator > Terminal
A good terminal manager is also key to success in my eyes, for this I used Terminator. Included by default in Kali and much more robust than the built in Terminal. Terminator still runs Bash but the ability to change profiles and split terminals horizontally and vertically was very nice! As you can see below you can have multiple tabs and windows open in various sizes split horizontally and vertically.
Useful Hotkeys:
Ctrl + Shift + O = Splits the terminal into a new terminal vertically
Ctrl + Shift + E = Split the terminal into a new terminal horizontally
Ctrl + Shift + Z = Maximizes a current tabbed window to full screen and then restores to tabbed by pressing again
Ctrl + Shift + T = Opens a new tab
Ctrl + Shift + C = Copy to clipboard
Ctrl + Shift + V = Paste
Logging
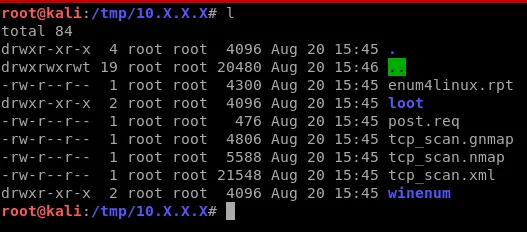
I did most of my logging by creating folders inside of /root/pwnshare/Labs/10.X.X.X where I would list the IP address of each target machine. In that directory I would save off reports, files, etc unique to that target or produced by commands I ran against that target. An example of such a directory is below and includes a TCP scan with all report formats, a manually saved off POST request to feed to Sqlmap, an output of enum4linux, and a loot and winenum directory with appropriate files in each.
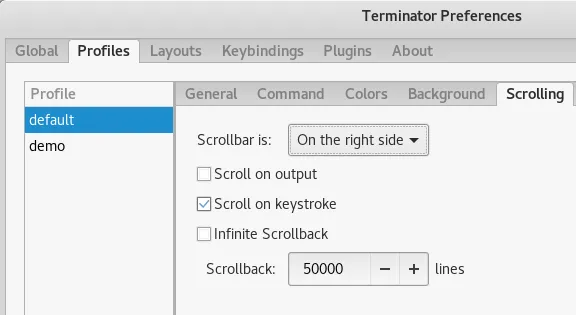
Terminator Scrollback
Another thing that helps immensely is setting your Terminator scroll back to more than a few thousand lines. I set mine to 50,000 you can also choose infinite scrollback! This way if I have a long output from a command on a remote system and doing have the ability to cleanly save a file off I can at least scroll back through my commands and the output and manually copy it out. A failsafe.
Script Tool Console Logger
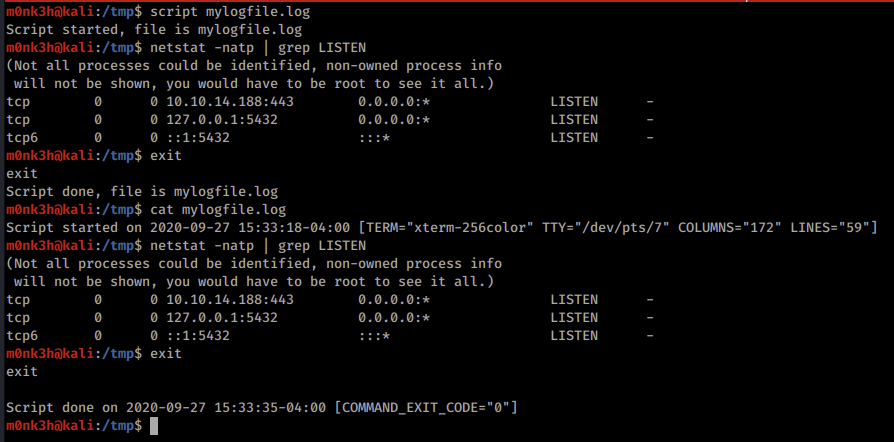
If you want to record every command you enter in a terminal window and the output, look no further than the horribly named tool called “Script”. I dare you to google for that tool, might be just a few “scripts” out there on the internet… At any rate, the tool is built into Kali and simple takes one variable, the filename. Once started it will save all input and output within that window the a text file you named as a variable.
To start the tool type:
script mylogfile.log
To stop the script logging tool from recording further type exit
Documentation: Using OneNote
I went with Microsoft OneNote for my documentation purposes for a couple of reasons, I was really comfortable with it already, it can sync to the cloud and backup automatically, and there is a mobile app so I can access my notes from my phone. The ability to log in to my account on onenote.com and view a web based version of OneNote was pretty awesome, but the mobile app worked great on my phone and tablet too. Having so many access methods to my notes was great when I was out and about and had some down time. Even without my laptop with me, I could still fire up my notes and review things I was working on to brainstorm my next attack path. When you work on the OSCP it really does consume you, and OneNote sure did help me itch that scratch.
I here great things about the built in tool to Kali Linux called KeepNote, and the newer replaced version on newer builds called CherryTree. Again its all preference though.
Some caveats here. If you have a Office 365 account you can download and install the OneNote application on your machine which is much better than the web based version. If you don’t have a subscription to Office 365 or don’t have the application from an older Microsoft Office package your not totally out of luck. Getting a free Microsoft account such as @outlook.com would give you the ability to store files in OneDrive and access OneNote Online. The browser based version is okay but you miss out on a lot of features and usability.
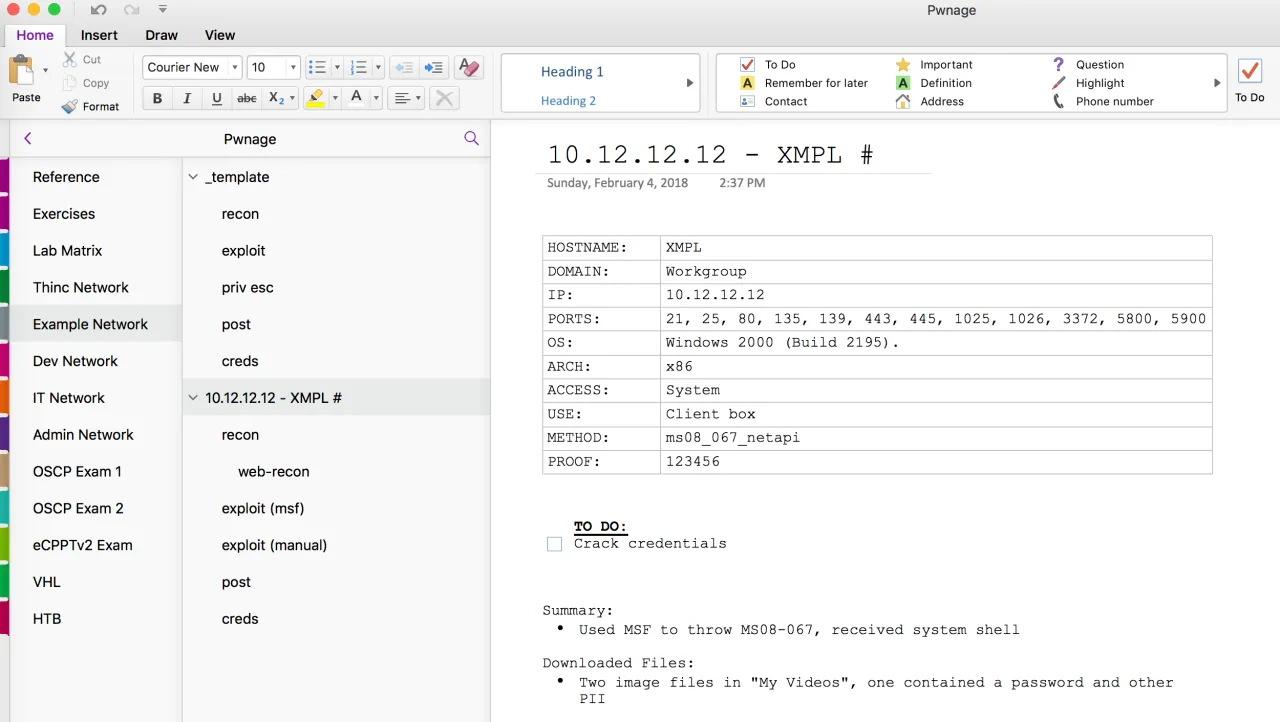
Below is how I organized my OneNote Notebook that I named “Pwnage”. The Example Network, as selected, is fictitious for example purposes. I created a template that was always at the top and had pages below it to document out the phases of the exploitation process. You can see in the 10.12.12.12 example machine named “XMPL” that I put some quick reference information about the machine too. I exploited this particular example machine in two different ways, using Metasploit and then manually. Documenting each step of this accordingly. Whenever I moved on to a new machine I would simple highlight the template and its sub pages and copy them to the clipboard, then select the very last page (in this example below it would be the creds sub-page of 10.12.12.12) and paste. This would paste the template and its sub-pages at the very bottom. I could then rename them accordingly and start working on a new machine.
Report Template
OffSec uses a standard template they recommend using for your exam report, its really clean and simple too. This is the report template that I used when preparing both my lab box report for bonus points as well as my exam report. My exam report ended up being 50 pages exactly and my lab box report was 157 pages by comparison. Documenting 10 machines exploitation steps as well as all of the exercises took a considerable amount of time and effort, so be sure to weigh that as its only a maximum of 5 bonus points for turning that in. I’d say all in all the lab report probably took me about 36 hours to complete.
Off Sec has these report templates on their website:
- https://www.offensive-security.com/pwk-online/PWKv1-REPORT.doc (Microsoft Word)
- https://www.offensive-security.com/pwk-online/PWKv1-REPORT.odt (OpenOffice/LibreOffice)
For more information on the exam guidelines and template see their exam guide: https://support.offensive-security.com/#!oscp-exam-guide.md
Pro Tips & Tricks
Transferring files with NetCat
The simplest nc to nc command requires that the listening device is able to listen and respond to packets. By default, some will not. By default, you can open a listener on your Mac but packets sent to your Mac will be blocked before nc has a chance to see them.
Some versions of nc do not require the -p flag. If your nc throws an error, try without the -p flag. The nc installed on your Kali VM will use the -p flag.
On the sending device you can cat a file into nc
cat file.txt | nc 192.168.1.123 34567and listen for the data using nc on the other devicenc -l -p 34567 > file.txt
Maintain filename or send multiple files
If you want to maintain the exact filename and directory structure, instead of risking a typo in the filename, use tar. The easier way to remember the tar flags is to say to yourself.. Create File Verbosely (cfv) and eXtract Files Verbosely (xfv).
Start your listener before sending files.
On the listening box:
nc -l -p 34567 | tar xfv -
On the sending box. Each of these commands will work.
Did you start your listener? Your TX box will happily send the data to a RX box that is ignoring you.
# Send one file
tar cfv - file | nc 192.168.1.123 34567

# Send multiple files
tar cfv - file1 file2 file3 | nc 192.168.1.123 34567

# Send multiple files
tar cfv - *.doc | nc 192.168.1.123 34567

# Send this dir and subdirectories
tar cfv - * | nc 192.168.1.123 34567

# Send a specified directory
tar cfv - important_stuff/ | nc 192.168.1.123 34567

# Send a specified directory and maintain absolute dir structure
tar cfv - /home/joe | nc 192.168.1.123 34567
Compress Data Stream
Text files compress pretty well. Media files like photos and videos are already compressed and wont compress much more.
The command new in this example is highlighted. we are using the -c option with gzip to send results to STDOUT.
nc -l -p 34567 | gunzip -c | tar xfv -
and sending files. Notice, one command is gzip and the other is gunzip. ..gUNzip
tar cfv - file1 file2 file3 | gzip -c | nc 192.168.1.123 34567
Compress and Encrypt
You want to get more complicated and encrypt data on its way out of the network. Use openssl inline.
First, you’ll want to pick a good key to use. Here is an easy way:
openssl rand 9999 | shasum
Here we tar up some files, zip them, encrypt them using AES and our key, and then send them to another box that does the same things in reverse.
# Sender
tar cfv - secret_file.*.txt | gzip -c | openssl enc -aes-256-cbc -salt -k a8280ba2ebc37d03bb0ffdb097ccdf7d5f56a8cd | nc 10.100.1.27 45678

# Receiver
nc -l -p 45678 | openssl enc -aes-256-cbc -d -k a8280ba2ebc37d03bb0ffdb097ccdf7d5f56a8cd | gunzip -c | tar xfv -

If you are trying to send between two different versions of openssl, you may need to use the -md option. New openssl using a sha instead of a md5 for a message digest.

# Sender
tar cfv - secret_file.*.txt | gzip -c | openssl enc -aes-256-cbc -salt -k a8280ba2ebc37d03bb0ffdb097ccdf7d5f56a8cd -md md5 | nc 10.100.1.27 45678

# Receiver
nc -l -p 45678 | openssl enc -aes-256-cbc -d -k a8280ba2ebc37d03bb0ffdb097ccdf7d5f56a8cd -md md5 | gunzip -c | tar xfv -

This is the same as above but opensll will send base64 instead of binary data over the line.
# Sender
tar cfv - secret_file.*.txt | gzip -c | openssl enc -aes-256-cbc -salt -a -k a8280ba2ebc37d03bb0ffdb097ccdf7d5f56a8cd -md md5 | nc 10.100.1.27 45678

# Receiver
nc -l -p 45678 | openssl enc -aes-256-cbc -d -a -k a8280ba2ebc37d03bb0ffdb097ccdf7d5f56a8cd -md md5 | gunzip -c | tar xfv -
Pulling Files
A few reasons why you may not be able to push files to a box:
The device you are pushing files may not be able to open a listener.
You are moving between NATed networks. — You might have a host machine in a 192.168.0.0/16 and a VM in a 10.0.0.0/8. Your host box wont be able to reach the 10.* but your VM will be able to reach the 192.168.*. You also cant open a listener from inside your LAN and hope that a device on the WAN side of your router will be able to connect.
You are trying to push to “bash” on Win10 and “bash” on Win10 can not open listeners. It can use nc to push files though
On the device you want to pull files from set up something like this:
nc -q0 -l -p 5454 < potential_attack_vectors.txt
This tells nc to listen (-l) on port (-p) 5454 and when something connects on that port, open and redirect this file through that connection.
The -q0 (zero) is needed in some cases. This is due to how the operating system tries to save time and limit I/O by sending data in chunks. The OS will send data in chunks. Sometimes the end of your file is in a chunk that hasn’t been sent yet…or ever. 🙁 When you use the -q0 flag, netcat will close the connection as soon it detects the end of your file.
On the device you want to to initiate the pull, you this:
nc 192.168.100.185 5454 > potential_attack_vectors.txt
Just to make sure you got what you expected, use the command md5sum as an integrity check on both devices.
root@kali:~/PWK/PWK_Labs/DEVICES# md5sum potential_attack_vectors.txt 48f24b4f34ed2a97d2ba7c6c1dc2f7ae potential_attack_vectors.txt